
How to Deconstruct a chair

Finally! A post to help walk you through deconstructing. To be quiet honest, this chair was an easy one which is why I choose it for this post. The fabric was practically falling off when I found it, yay! I would say my MOST asked question is “How do you know if a chair or couch is a good candidate for deconstruction?” There is no real direct answer to that question but I can give you some things that I look for when searching for a new piece to deconstruct.
- Is it old? Its no secret that I love vintage goods and they make the best candidates for deconstructing because of their patina and character. They are also made differently than new furniture. you wont find burlap or worn webbing under a pottery barn couch . However, you can add the “old” deconstructed look to a new piece too. It will just add more work but it can be done. Best pieces in my opinion have the original fabric. Makes life easier and if its kinda falling off, well it’s doing your job for you!
- Is it sturdy? I have ripped open several pieces only to find that they are broken underneath – bummer. Of course these things can be repaired but because part of deconstructing is exposing the wood inside that was covered up before. A bunch of glue, nails or staples wouldn’t be to cute to show exposed. I recommend sitting in it, wiggling around, making sure everything seems right and tight before you purchase it.
- How is the shape? Do you like the shape? You can change the fabric and wood color but you cant change the shape of the frame- so make sure you like it.
- Price? This is another top question. There isn’t really a good answer. Its all about what your budget allows you to spend. If your doing this for yourself and not to sell I would say spend a little more to make sure you love the bones. Obviously for re-sell these are very time intensive and require a lot of work so don’t spend to much so you can make a profit and pay yourself for your work.
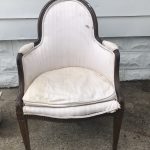
So, I found this piece at a flea market right after entering the gate. It was sturdy, old, original fabric AND the fabric was falling off – BONUS! It was also a bargain so I had to have it!
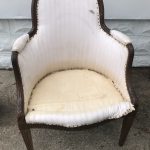
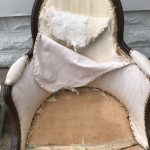
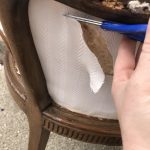
See. Lots of water stains on the cushion which I actually just threw away. I started by ripping off the piping which usually is a pain but since this chairs fabric was loose to begin with it, hardly took any effort. I started the piping by inserting scissor tips under the piping to create a gap. From there I just pulled it off. Actually, I only used scissors this ENTIRE project. No staple remover or tack remover needed – yeah! It pays to find old original fabric pieces.
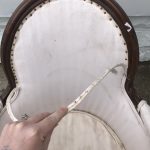
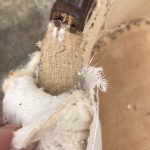
Underneath the piping is tacks. which were also super easy to remove. There are normally lots of layers of tacks and staples as there are numerous layers of fabric, batting and burlap.
I then started to remove the seat area. Always try and peel back layer by layer so you don’t ruin any existing muslin or burlap underneath. You will want to preserve what’s hopefully in great condition underneath. Its best when you can use what was already existing on the chair as it adds to the charm of deconstruction. I just lightly inserted sharp scissor tips in to the first layer of top fabric and stared to pull with my hands to see what was underneath.
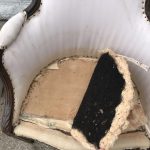
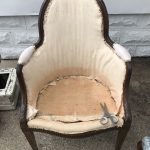
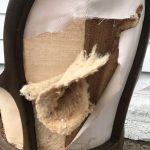
After all the bottom seat fabric, stuffing and horse hair ( GAG ) was removed, I started on the back. Again, with only scissors lightly cutting a small hole into that first layer of fabric and then ripping lightly from there.
This was the muslin layer BUT it was kinda gross still. There was actually two more layers under the one shown so I finished removing those and exposed the very last layer of muslin which was in perfect condition.
After removing the little arm pad fabric and batting, I decided to take it all the way down to wood because there was horse hair sticking out of the muslin.
The back had a layer of fabric and a thin layer of batting. So again, being super careful, I made a small hold in the top fabric and the cut around as close to the wood as possible.
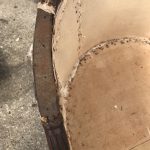
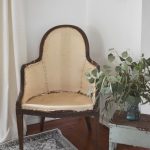
I did the same to the back and the remaining side. I can say after deconstructing furniture for over a year this is probably the easiest deconstructed chair I have ever done. So just find an old chair with original fabric and hopefully yours will be just as easy.

We took a snack break before wiping all the wood down with Murphys Oil Soap.

Thank you so much for stopping by today. Let me know what you think, I would love to hear from you. Be sure to follow me on Facebook and Instagram for more!
Thank you so much for the tutorial!!!
I definitely needed this and I can’t wait to tear into my first chair this week. 😊
Of course! Thank you for reading, Good luck on your first chair. It sure is fun to rip these apart.
It works really well for me